Useful Information for All
Resources Available:
- How to Establish and Manage a Layered Worm Farm for Composting Food Waste
- How to Use the Bokashi System for Composting Food Waste
- Caring for Modern Cloth Nappies
- UNEP - Easy Ways to Green Your Daily Routine
- Organising a Zero Waste Event
- Battery Recycling for Workplaces
- Food Waste and Compostables Collection Service
How to Establish and Manage a Layered Worm Farm
By Earth Angel
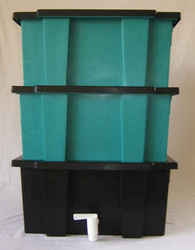
Setting Up a Layered Worm Farm:
- Put the tap in the hole on the black layer and screw on yellow ring on the inside to hold it in place.
- Place plant container in the black layer upside down (for worms to climb out of the liquid layer).
- Place one lid with holes in it on the black layer.
- Place one green bin on the lid as above.
- Place a single layer of newspaper into the bottom green bin and then tip the worms inside.
- Place one lid with holes in it on the green layer.
- Place one green bin on the lid as above.
- Place the lids with small holes or no holes on the top.
- Ideally the worm farm should be placed on bricks or the veranda out of the direct summer sun so that you can place a bottle under the tap to collect the liquid fertiliser.
Placing Food Waste in the Worm Farm:
- To begin your worm farm, place all the food waste in the bottom green layer with the worms.
- Keep adding food waste until the food reaches around 4 cm below the top of that layer.
- Once the layer is full of food waste then start placing the food waste in the next layer.
- When you start the next layer, find some of the worms in the first full layer and transfer them into the next layer you are beginning – this will help it get started much faster.
Harvesting the Soil:
- As your worm farm is new, it may take 3 – 6 months for the worm population to grow to process the quantity of food waste you are placing into it.
- To start the new empty layer, place 2-3 heaped garden forks of soil and worms into the new layer to start it, don't wait for the worms to climb from the previous layer as it will take 12 months until they fully compost it and start searching for new food waste (way too long).
- Once you fill the second layer swap the bottom layer to the top for harvesting.
- Leave the lid off so that the worms go down away from the daylight.
- Harvest a palm's worth of soil (2-3 cm) into a bucket or wheelbarrow and try not to collect any worms.
- Repeat the above process every 30 minutes until you are 2 – 3 cm from the bottom.
- This leaves quite a few worms in the layer to start it off again as you place food waste in.
Note: If you see lots of ‘small round green/brown things’ in the layer you are harvesting, consider not emptying the processed layer yet as these are worm eggs and the population is growing to process the food waste you place into the worm farm much quicker.
Using the Liquid Fertiliser:
- The liquid fertiliser or ‘worm wees’ as children love to call it, comes from the fruit and vegetables breaking down, and the rainwater getting into the worm farm.
- The best way to use worm liquid is to pour it around the plants you want to fertilise not directly on the plant.
- Depending on the colour of the worm liquid you may or may not need to add water
a. Dark liquid – add water
b. Light liquid – use as is
Frequently Asked Questions:
What is wrong with my worm farm?
Smell - You have put in too much of something and the worms don’t like it.
Mould - You have put in too much bread or something similar
Solution:
Mix the layer up to spread out the food waste and mix the worms into the whole layer. Add some garden lime to balance the PH levels. A healthy worm farm should not smell.
Why Do I Bugs and Fruit Flies in My Worm Farm?
Bushes and Trees - If you have placed your worm farm under a bush then you might get some fruit flies or bugs.
Smell - Your worm farm is beginning to go out of balance for the PH levels.
Solution
Move your worm farm away from bushes as this will reduce the bugs or place a layer of cardboard or carpet off-cut into the top layer where you are putting the food waste. Remember that depending on the bugs, it could also be the sign that your worm farm is a healthy ecosystem too.
Buy a bag of garden lime and generously spread over the food waste and soil, this will re-balance the PH levels.
My Worms Died, Now What DO I Do?
It happens to us all occasionally. You have either not fed them enough when you are on holiday, put in something they did not like or they got too hot.
Solution
Start again by putting in some new tiger worms – but learn from what may have happened so you don’t accidentally do it again.
How to Use Bokashi the Bokashi System to Compost Food Waste
By Bokashi Limited
Valuable fertiliser from your kitchen waste in just 4 weeks!
This system ferments kitchen waste in a simple, easy to use, cost effective process so you will enjoy:
- Less odour as the food ferments
- Decreased composting time – up to 50% quicker
- Increased growing power
- Healthier Plants
- Better plant growth
- And of course, you are helping to preserve the environment.
- Two buckets nested one upon the other. The outermost bucket has tight fitting lid and the inner bucket has holes in the bottom to allow for drainage of any liquids into the outer bucket. This is drained regularly during the fermentation period.
- A bag of Compost-Zing which when added to kitchen waste starts the fermentation process.
- A welcome pack introducing you to the system plus a free instruction guide.
Food scraps you can compost:
- You can use all food waste (drained foods are best) including
- Fresh fruit and vegetables
- Prepared foods
- Cooked and uncooked meats and fish
- Other foods: cheese and eggs, bread, coffee grounds, tea bags
- Wilted flowers
- Liquids such as milk, orange juice and oils
- Paper and plastic wrap, and meat bones
- Shells from seafood
What does the final product look like?
After fermenting a minimum of 48 hours or preferably up to 7 – 10 days I summer and 10 – 14 days in winter, open the container and you will see that the food has been preserved like pickles. The fermented food does not break down or decompose while it is in the bucket. The following indicates that the process has been a success.
Smell: Well fermented food organics should have a smell similar to that of pickles or cider vinegar.
Visual: Occasionally, particularly for longer fermentation periods, a white cotton-like fungi growth may appear on the surface. That shows that good fermentation process has occurred.
Sometimes a liquid is produced from the fermentation and drains into the bottom of the bucket.
The amount and colour of the liquid drained will depend on the type of foods you have put into the bucket. Fruit and vegetables tend to release more liquids than other foods. Do not be concerned if little or no liquid is produced.
The liquid can be used for:
The garden: This liquid contains nutrients from the food waste and is alive with beneficial microbes. To fertilise an existing garden or house plants dilute to 1:100 – 2 Tablespoons for 5 Litres of water and apply to bare soil. For foliage dilute to between 1:500/1:1000, ie 1-2 teaspoons to 5 Litres of water.
Around the house: Pour the concentrated liquid directly into your kitchen and bathroom drains, toilets or septic system. The juice will help to prevent algae build-up and control odours.
The bucket juice should be used within a day or two after draining from the bucket.
What should I do with the final product?
In existing gardens: Dig a hole/trench approximately 20-25 cm deep, add the fermented food waste and mix with some soil. Then cover with the remaining soil. The fermented waste is acidic when first dug in but neutralises after about 7-10 days.
Bacteria in the soil and waste will start to break down the food and after about 3-4 weeks all the food will have decomposed.
Alternatively, if space is at a premium or trenching in your fermented waste becomes difficult you can either use:
- Vertex Composts
- Traditional Compost Heap
- Worm Farm
Trees: Dig deep holes 25-35 cm deep at 60cm intervals around the tree drip line. Bury the fermented food waste in the holes as before. The waste will supply your plants with a great food source and inoculate your soil with useful microbes for plant growth.
Wash the bucket with water at the end of the batch. DO NOT use chlorine based cleaners.
How to Care for Modern Cloth Nappies
Pocket Nappies
By EZPZ Baby
Introducing Modern Cloth Nappies
The outside of the nappy is made from Polyurethane Laminate (PUL). This helps to keep the outside of the fabric dry to stop leaks. The inside is lined with micro fleece, which is a stay dry fabric. Because it is not a natural fabric it does not absorb any moisture. This means that when used as a layer next to the baby’s skin the moisture passes straight through into the absorbent part of the nappy, and away from the baby’s bottom. This helps to keep baby’s bottom dry. Each nappy come with one micro fibre insert. The insert is the absorbent part of the nappy and is placed in a pocket in between the PUL and the micro fleece layers. We have found the micro fibre insert particularly good but you could also use your old flat cloth nappies.
The great thing about pocket nappies is that you can add extra inserts for added absorbency. At night add extra inserts to further increase the absorbency.
These nappies are very easy to care for. They require no soaking. They are fast drying and best of all they will save you a lot of money over time.
Care Instructions:
Pocket nappies can be washed in cold, warm or hot (up to 75 deg C), and dry in a cool/medium drier. Washing on hot and drying on hot won't make your EZPZ cloth nappy fall apart, it will just make the not last as well - say maybe through 2 children instead of 3 - Polyurethane Laminate (PUL) is a very durable fabric. Do not use chlorine bleach or fabric softeners.
Tip solids into the toilet and then rinse under a tap.
No need to soak.
Store in a dry bucket (ie with no water in it).
Limit barrier creams as they can leave a residue on the micro-fleece. Liners recommended for use with barrier creams.
Hang the pocket nappy and insert on the clothesline whenever possible as the sun is a good natural disinfectant and stain remover.
UNEP - Easy Ways to Green Your Daily Routine
Earth Angel recommends you have a quick read of Easy Ways to Green Your Daily Routine as offered by the United Nations Environment Programme.
Organising a Zero Waste Event
Organising an event has it challenges at the best of times, including what to do with all the rubbish. Thinking about what to do with all the waste all in the planning stages is important as that is where the opportunities are to organise a Zero Waste event.
There are recyclable containers (cans, tins, drink bottles), food waste, serviettes, paper, cardboard and mixed waste to think about, as well as informing the stall holders on how they can participate in the Zero Waste event too.
Case Study: Waitangi Day 2009 - Okahu Bay Zero Waste Case Study
Planning a Zero Waste event includes:
- Deciding to organise a Zero Waste event and put it in the objectives for the event.
- Sourcing a supplier for compostable plates and cups (Earth Angel can help you here - Catering Supplies).
- Informing food vendors on how to separate recyclables and waste for their stalls.
- Organising bins in pair (1 x Recyclables and 1 x Waste to Landfill) for around the event site or ask your recycling and waste contractor to do this for you.
- Organising Food Waste collection bins for around food vendors and other appropriate locations and organise for someone to compost the food waste at the end of the event.
- Use the New Zealand recycling symbols for labelling bins to educate vendors and the public on which bins to use, or suggest that vendors take their recycling and waste back to their business premise or home for recycling or disposal.
- Organise a Zero Waste education team to provide on the day information to the public on how to separate the recyclables and ensure there is minimal contamination of waste in the recycling bins (try a sports club or youth group wanting to fundraise).
- Let the public know about your Zero Waste event through posters and announcement – be encouraging.
- Include outcomes from the Zero Waste event in your final report.
Battery recycling for Workplaces
If you are looking for a recycler of batteries for your workplace, try:
Rubbish Direct
Rodger Howie
027 431 1973
rodger@rubbishdirect.co.nz
Food Waste and Compostables Collection Service
Envirofert
Food waste collection in Auckland and Hamilton
Food scraps, coffee grinds, paper towels, wooden skewers and even compostable packaging made from PLA, Potato Pak and Cornstarch. Basically, anything that will compost in a commercial facility but definitely no glass, metal or plastic.
Contact details:
hello@wecompost.co.nz | 0800 WECOMPOST (932667)